
Page 153 - COSTILES Carrelages et Bains - Catalogue Zenon Gel Coat
P. 153
152 153
PRIMER PASO.
Aplicar mortero en las paredes, para nivelarlas. Hay que tener en cuenta el grosor del panel, para
que no sobresalga de la base. APLICAR MORTERO APPLY MORTAR APPLIQUER MORTIER APPLICARE MALTA
INSTALACIÓN PLATOS DE DUCHA | SHOWER TRAY PREPARATION Tenga siempre en consideración el utilizar el embalaje de cartón como protección del plato de
ducha, durante la colocación de los paneles.
FIRST STEP.
INSTALLATION DU RECEVEUR | INSTALLAZIONE DEI PIATTI DOCCIA Apply mortar on the walls to level them. We shall consider the panel thickness so that it does not
protrude from the base.
Bear in mind that we shall always use the cardboard packaging as protection for the shower tray
INFERIORES A 1000 MM | SHORTER THAN 1000 while installing the panels.
DONT LA LONGUEUR EST INFÉRIEURE À 1000 | INFERIORI A 1000 MM PREMIÈRE ÉTAPE.
Enduire les murs de mortier afin de les niveler. Il faut tenir compte de l’épaisseur du panneau et faire
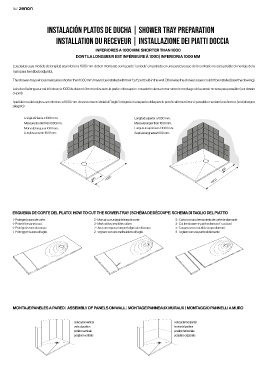
Los platos cuya medida de longitud sea inferior a 1000 mm. deben montarse con la parte “cortada” empotrada en una pared ya que de lo contrario no será posible el montaje de la en sorte qu’il ne dépasse pas de la base.
Il est particulièrement recommandé d’utiliser le carton d’emballage pour protéger le receveur de
mampara (ver dibujo adjunto). douche pendant la pose des panneaux.
The shower-trays whose measure is shorter than 1000 mm. have to be installed with their “cut” part built-in the wall. Otherwise the shower sceen couldn’t be installed (see the drawing). PRIMO PASSO.
Applicare la malta sulle pareti, per livellarle. Si deve tenere conto dello spessore del pannello,
affinché non fuoriesca dalla base.
Lats dont la longueur est inférieure à 1000 ils doivent être montés avec la partie «découpée» encastrée dans un mur sinon le montage de la paroie ne sera pas possible (voir dessin Usare sempre l’imballaggio di cartone per proteggere il piatto doccia durante la posa dei pannelli.
ci-joint). APLICAR RESINA CARA EN CONTACTO CON EL MORTERO
APPLY RESIN FACE IN CONTACT WITH THE MORTAR
I piatti la in cui la lunghezza è inferiore a 1000 mm. devono essere dotati di “taglio” integrato in una parte della parete perché altrimenti non é possibile montare lo schermo. (vedi disegno SEGUNDO PASO. APPLIQUER RÉSINE CÔTÉ EN CONTACT AVEC LE MORTIER
allegato) Aplicar la resina de unión, en la cara del panel que vaya a poner en contacto con el mortero.
Esperar 24 horas de secado, para poder utilizar los paneles. APPLICARE RESINA LATO IN CONTATTO CON LA MALTA
SECOND STEP.
Longitud inferior a 1000 mm.: Longitud superior a 1000 mm.: Apply the joint resin on the panel face that will be in contact with the mortar.
Measure shorter than 1000 mm.: Measure longer than 1000 mm.: Allow to dry for 24 hours before using the panels.
Moins de longueur 1000 mm.: Longueur supérieure à 1000 mm.: DEUXIÈME ÉTAPE.
Lunghezza sotto 1000 mm.: Sopra la lunghezza 1000 mm.: Appliquer la résine d’accrochage sur le côté du panneau qui sera en contact avec le mortier. PLANCHA ZENON GEL COAT
Laisser sécher pendant 24 heures pour pouvoir utiliser les panneaux. ZENON GEL COAT PANEL
PANNEAU ZENON GEL COAT
SECONDO PASSO.
Stendere la resina di unione sul lato del pannello da mettere in contatto con la malta. 24 H. DE SECADO PIASTRA ZENON GEL COAT
Fare asciugare 24 ore prima di usare i pannelli. DRY FOR 24 H
24 h DE SÉCHAGE.
24 ORE DI ASCIUGATURA
TERCER PASO.
Colocar un cinta adhesiva en la parte baja de la pared continua al plato de ducha.
430 Aplicar la cola porcelánica en toda la superficie de las paredes mastreadas.
Cuando coloque el panel deberá estar superpuesto un centímetro aprox. sobre el plato de ducha por
430 >1000 <1000 toda la superficie del plato. APLICAR COLA PLANCHA ZENON
Primero colocaremos el panel donde hemos puesto la cinta adhesiva, levantandolo poco a poco
hasta apoyarlo completamente en la pared.
Al panelar es importante que el panel este bien apuntalado para que se pegue y no se arquee . PORCELANICA GEL COAT
APPLY PORCELAIN ZENON GEL COAT
THIRD STEP. GLUE PLATE
Place adhesive tape at the bottom of the wall that is next to the shower tray. APPLIQUER LA PANNEAU ZENON
Apply the porcelain glue on the entire surface of the plastered walls. COLLE À CÉRAMIQUE GEL COAT
When you install the panel, it must overlap approx. one centimeter over the shower tray throughout the
tray surface. APPLICARE COLLA PIASTRA ZENON
ESQUEMA DE CORTE DEL PLATO | HOW TO CUT THE SOWER-TRAY | SCHÉMA DE DÉCOUPE | SCHEMA DI TAGLIO DEL PIATTO We shall first install the panel on which we have placed adhesive tape, lifting it slowly until it is completely PER CERAMICA GEL COAT
leaning on the wall.
1.- Proteger la zona de corte: 2.- Marcar con un lápiz la línea de corte: 3.- Cortar con una herramienta de corte de diamante When paneling, it is important that the panel is underpinned well so that it sticks and does not bend.
1.- Protect the zone to cut. 2.- Mark with a pencil the cut line 3.- Cut the shower-try with a diamond´s cut tool
1.- Protéger la zone de coupe. 2.- Avec un crayon, marquez la ligne de découpe. 3.- Couper avec un outil de coupe diamant. TROISIÈME ÉTAPE.
1.- Proteggere la zona di taglio. 2.- segnare con una matita la liena di taglio. 3.- Tagliare con una punta di diamante. Placer un ruban adhésif sur la partie basse du mur le long du receveur de douche.
Étaler la colle à céramique sur toute la surface des murs enduits.
Au moment de placer le panneau, celui-ci doit être superposé d’environ un centimètre sur toute la
surface du receveur de douche.
Poser tout d’abord le panneau où l’on a collé le ruban adhésif, en le soulevant progressivement jusqu’à
ce qu’il soit complètement appuyé contre le mur.
Lors de l’installation des panneaux, il est important que ceux-ci soient bien étayés pour les coller sans
les courber.
TERZO PASSO.
Mettere del nastro adesivo sulla parte bassa della parete contigua al piatto doccia.
Stendere la colla per ceramica su tutta la superficie delle pareti intonacate.
Posizionare il pannello sovrapponendolo di un centimetro circa lungo tutta la superficie del piatto
doccia.
Per prima cosa collocare il pannello dove si è messo il nastro adesivo, sollevandolo progressivamente
fino ad appoggiarlo completamente alla parete.
Quando si pannella, è importante che il pannello venga ben puntellato affinché si incolli e non si inarchi.
RELLENAR CON MORTERO FILL WITH SPECIAL MORTAR
ESPECIAL PARA JUNTAS CERÁMICAS FOR CERAMIC JOINTS
CUARTO PASO. REMPLIR AVEC DU MORTIER SPÉCIAL RIEMPIRE CON MALTA SPECIALE
MONTAJE PANELES A PARED | ASSEMBLY OF PANELS ON WALL | MONTAGE PANNEAUX MURAUX | MONTAGGIO PANNELLI A MURO Rellenar las juntas entre paneles y plato con el mortero especial para juntas cerámicas. POUR JOINTS DE CÉRAMIQUE PER FUGHE CERAMICHE
Dejar secar 24h para su utilización.
FOURTH STEP.
colocación vertical colocación horizontal Fill the joints between the panels and the tray with the special mortar for ceramic joints.
Allow to dry for 24 hours before using
vertical position horizontal position 24 H. DE SECADO
position verticale position horizontale 24 h DE SÉCHAGE.
DRY FOR 24 H
posizione verticale posizione orizzonale QUATRIÈME ÉTAPE. 24 ORE DI ASCIUGATURA
Combler les joints entre les panneaux et le receveur avec le mortier spécial pour les joints de céramique.
Laisser sécher 24 h avant utilisation.
QUARTO PASSO.
Riempire le fughe fra i pannelli e il piatto doccia con la malta speciale per fughe ceramiche.
Lasciare asciugare 24 ore prima dell’uso.